This is a best practice guide to follow if the person processing your Ecommerce orders in Cloud POS is not the same person who picks and packs the stock in your warehouse (or store). This particularly suits Citrus-Lime customers with large despatch warehouses that are separate from their admin office(s).
Step 1: Load the Picklist
In the Citrus-Lime Back Office, navigate to the Pick List in the menu. You will find this under Customers, Receipts & Orders > Picklist.
Choose your store. For most users of this article, this will be your primary despatch location.
If you wish, you can set date filters to filter by dates created. Most of the time, you will want to view all current open orders by leaving the tick box 'Show Orders For All Dates' ticked.
Click Load Picklist.

Step 2: Filter the Picklist for Fully in Stock Orders
To check that you are viewing all currently open orders, it is a good idea to click 'Remove Filters' before you start:

We would recommend starting with orders that are fully in stock. To do this, click the filter button for 'Fully in Stock', shown here:

This will filter your Picklist grid to show only the orders where every item is available for despatch.
Step 3: Process the Order in Cloud POS
1) When the order first loads, click the blue button, 'Complete Pick-up of Scanned Items'. (This screen would be used if you were using a barcode scanner to despatch items that you physically had in front of you.)
2) Use the tick box to 'Select All for Pick-up' on the right. This is appropriate here because you're despatching an order that you know is fully in stock. You will see each item line's 'Pick-up' tick box goes blue.
3) Click 'Print Label':

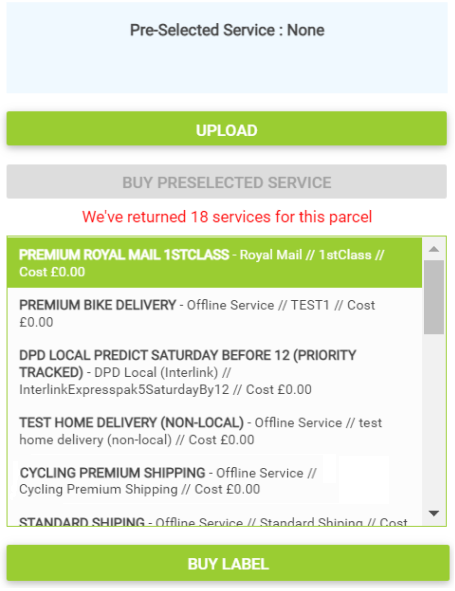
4) If the customer has pre-selected their courier service online, you will be able to choose 'Buy Preselected Service'.
If they have not, you will see 'Pre-Selected Service: None'. In this case, click 'Upload', and choose your courier service from the list, then 'Buy Label'.
5) Return to till screen, and click 'Tender'.
6) The payment type will be auto-filled for you (Internet Order, PayPal etc.) so you can just click 'Continue with Transaction' on the right.
7) On the receipt page, we would recommend setting the top slider to 'No' and the bottom to 'Yes' (if you want to send an e-receipt, of course). Click 'Complete Transaction'.
8) On the Post Transaction screen, click the button to 'Preview and Print A4 Receipt'.
9) Print this A4 receipt, and attach the courier label to it (e.g. with a paperclip). This can then be passed to your warehouse team to pick, pack and despatch the order.
10) Return to your Pick List. Click the green button to 'Refresh Order Grid' at the bottom. The order that you have just processed will disappear, as it is now closed. You can now open the next order that is fully in stock, and repeat the steps above to process the order. Keep going like this until you have printed courier labels and A4 receipts for all of your fully in-stock orders.
Step 4: Filter the Picklist for Partially in Stock Orders
Once all of your Fully in Stock orders have been processed (which will mean your Picklist grid is now empty), change your stock filter to show the 'Partially In Stock' orders:

You can now repeat all of the steps in Step 3 above, with two small differences:
- Instead of clicking 'Select All for Pick-up', just tick the pick-up boxes for the items that you are able to despatch today. You will be able to clearly identify these because items that you can't despatch will show a red message:

- When you print the A4 receipt, it will only show the items that have been chosen for pick-up (i.e. for despatch) today.
Attach the courier label to the A4 receipt, as before, and this will allow your warehouse team to clearly see just the items they can pick and pack today.
Again, each time you go back to the Picklist, click 'Refresh Order Grid'. Your processed partial orders will disappear (you can see them by putting on the 'No Stock' filter). Once some more stock arrives for those orders, e.g. the following day, they'll appear in either Fully in Stock or Partially in Stock once again.