Introducción al Panel de tareas
Task Pad está diseñado para acelerar las tareas diarias al proporcionar acceso rápido a los productos a los que más accede a través de un árbol de categorías fácil de navegar.
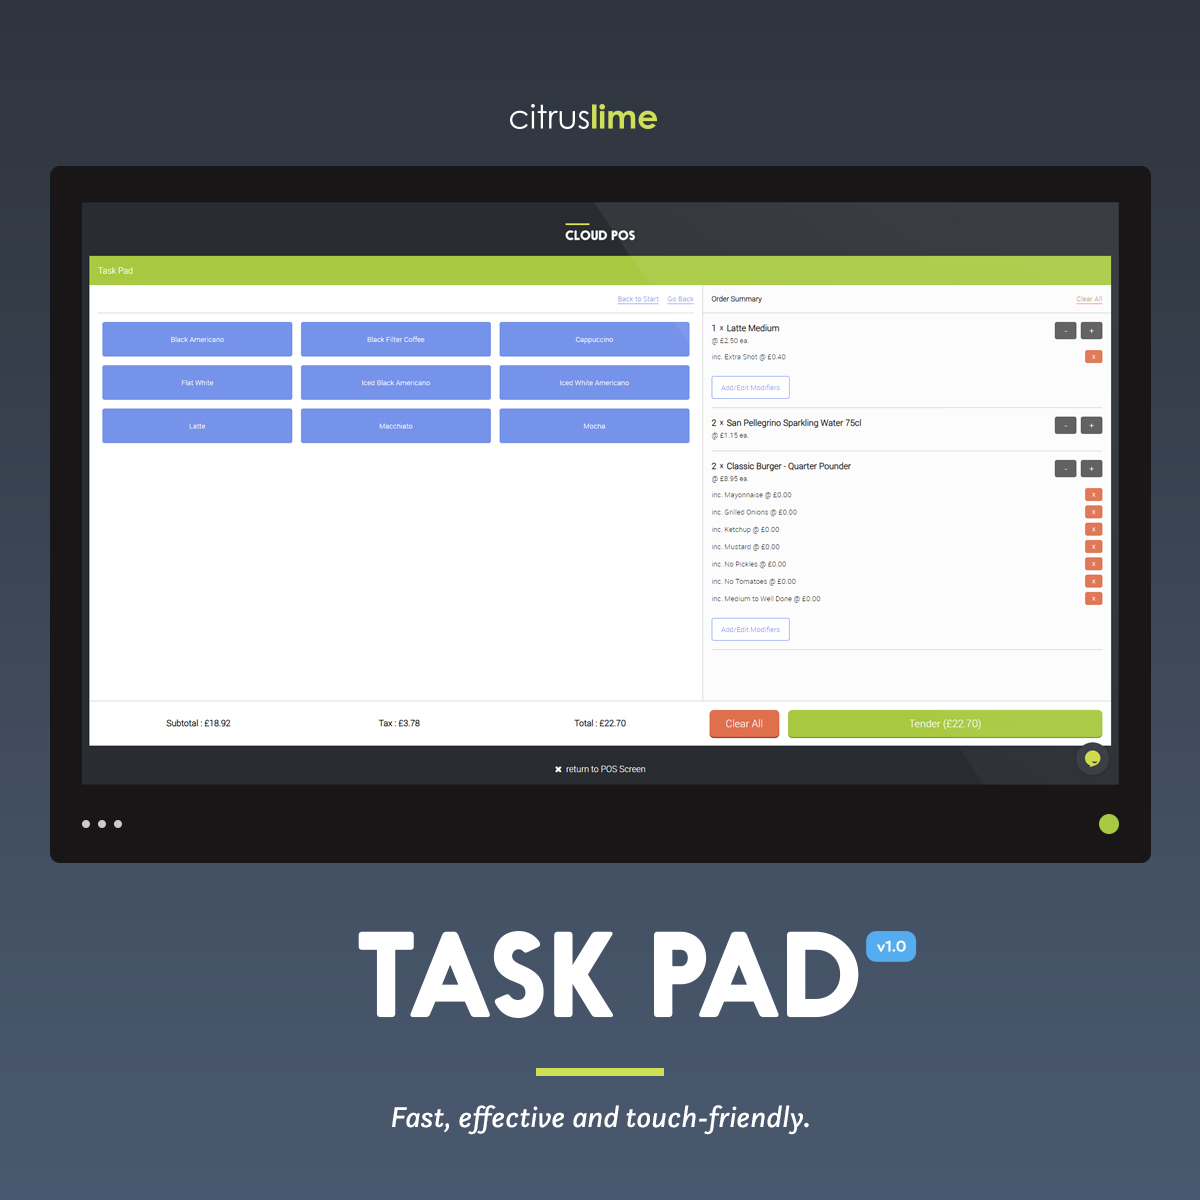
Gracias a su diseño táctil, el Panel de tareas es perfecto para cafeterías, bares y otros entornos de servicio rápido, ya que le permite navegar, seleccionar e incluso personalizar los productos seleccionados de manera clara; creando un pedido sobre la marcha.
Los pedidos del Panel de tareas pueden entregarse inmediatamente o revisarse en la Cloud POS antes de completarse. Los pedidos del Panel de Tareas también se pueden asignar a un Cliente, además de almacenarse como una Orden de Trabajo para su futura recuperación y procesamiento.
¡No te saltes esto! Antes de empezar...
A los efectos de este CÓMO, analizaremos el Panel de tareas en el contexto de un entorno de cafetería (imaginado).
Esa decisión se basa casi por completo en la letanía de cafeterías y restaurantes de la calle principal a tiro de piedra de la Citrus-Lime MCR (desde donde escribo esto y mi preocupantemente profundo conocimiento de sus respectivos menús).
También se debe a que un número cada vez mayor de nuestros clientes minoristas están introduciendo este tipo de experiencia en sus tiendas físicas y Task Pad es una respuesta directa para respaldar esta oferta.
Sin embargo, el Panel de tareas es una excelente función para mejorar la velocidad con la que pueden ocurrir las ventas de artículos comunes (particularmente las ventas de artículos para los que normalmente no realiza un seguimiento del inventario, como los artículos de servicio; piense en Wheel True o Brake Bleed como parte de un Servicio de Bicicletas).
Task Pad también puede simplificar el trabajo de estos tipos de transacciones.
“Cada minuto que dedicas a la planificación ahorras diez minutos en la ejecución”
- Brian Tracy. CEO de Brian Tracy Internacional
Si asiente con la cabeza en señal de aprobación... es una buena señal. Por muy tentador que sea simplemente sumergirse directamente, se recomienda encarecidamente planificar cómo estructurará sus Categorías de panel de tareas, Plantillas de modificador y Opciones de modificador antes de emprender el tiempo del teclado.
Mi recomendación es comenzar su planificación enumerando los productos finales que ofrecerá en su Café y también las formas en que permitirá que sus clientes modifiquen esos productos.
Recomiendo encarecidamente que haga esto en papel (o en una hoja de cálculo). Es más fácil para usted reflexionar sobre su enfoque, compartir su trabajo con otros y refinar su estructura antes de comprometer el tiempo de configuración en Cloud POS .
¿Qué se entiende por "Productos Finales"?
Por ejemplo, consideremos un "Latte". Hay diferentes formas de abordar esto pero, en mi opinión, consideraría un "café con leche" como un tipo de producto , no como un producto final . En el lenguaje tradicional de Cloud POS , un Latte sería un Matrix Parent . Los componentes de la matriz de Latte serían relativos al tamaño .
Padre matriz:
- Latté
Componentes de la matriz:
- Pequeña
- Medio
- Grande
- Extra grande
Entonces, en mi opinión, un 'Latte grande' es un producto final . Pero, en esta era de "Hágalo a su manera", aún debe poder adaptar este producto final a la forma en que su cliente quiere tomar su cafeína matutina.
Ahí es donde entran en juego las opciones del modificador del panel de tareas.
El Panel de tareas le permite crear y administrar Plantillas de modificadores , en las que puede crear Opciones de modificador .
Un ejemplo de una plantilla de modificador sería "Coffee Shots & Syrups".
Las Opciones de modificador se pueden considerar como los medios con los que personalizar un producto (o servicio) para su cliente. Las opciones de modificador no Cloud POS seguimiento de inventario y vienen en dos formas... Notas y modificadores de precio .
Los Modificadores de Notas no afectan el precio final del Producto Final; Los modificadores de precio sí. Al crear opciones de modificador, simplemente seleccione el tipo de modificador que necesita usar de una lista desplegable y, si es un modificador de precio, también ingrese un precio que se agregará al precio del producto final.
Digamos que un cliente que elige tener su Latte grande como "Skinny" es una selección que no modifica el precio. Lo crearía como un modificador de nota .
Digamos también que el cliente también solicita que su Large Skinny Latte venga con un Extra Espresso Shot y un potenciador de sabor de Hazelnut Syrup, y que ambas opciones tienen un cargo adicional. Usted crearía estas Opciones de Modificador como Modificadores de Precio .
Para los propósitos de este ejemplo, digamos que:
- un Latte grande tiene un precio de £2.40;
- un trago Extra Espresso tiene un precio de £0.40 y
- un chupito de sirope de avellana tiene un precio de 0,25 £.
Si su cliente solicita un "Latte grande, flaco, Extra Espresso Shot con sirope de avellana", entonces ha solicitado un Producto final + Modificador de nota + Modificadores de precio .
Repasemos esto:
Artículo del componente Matrix: Latte grande @ £ 2.40
Modificador de nota: Flaco (sin cargo)
Modificador de precio: 1 x Extra Espresso Shot @ £ 0.40, 1 x Sirope de avellana @ £ 0.25
En total, el precio final de este café personalizado es de 3,05 £.
Diseño de las categorías de su panel de tareas
Una vez que haya diseñado sus productos finales y modificadores, el diseño de las categorías de su panel de tareas debería ser un proceso relativamente simple.
Las categorías del panel de tareas se pueden considerar como un medio con el que crear un menú paso a paso jerárquico que lleva al usuario hacia un conjunto agrupado lógicamente de elementos de Cloud POS
Información vital
Es importante tener en cuenta que cada nivel de su jerarquía de categorías está restringido a 8 x categorías en cada nivel .
Esto significa que puede crear hasta 8 categorías de nivel superior y cada una de ellas puede tener 8 categorías de subnivel . Cada una de las categorías de subnivel puede tener hasta 8 categorías de subnivel y así sucesivamente... y así sucesivamente...
El último nivel de categorías que crea se conoce como categorías de nivel final .
Las categorías de nivel final son donde normalmente vincula los Cloud POS la nube que desea poner a disposición a través del Panel de tareas.
Dentro de cada categoría de nivel final , puede vincular hasta 40 productos de Cloud POS
Continuando con el tema del café con leche, si el café con leche es un tipo de café y el café es un tipo de bebida caliente y la bebida caliente es un tipo de bebida, entonces la estructura de categorías de su panel de tareas probablemente debería ser la siguiente:
Bebidas > Bebidas Calientes > Cafés
Este enfoque brinda una señal clara al usuario del Panel de tareas y lo conduce limpiamente hacia un conjunto manejable de productos finales.
Un ejemplo :
Bebidas > Bebidas Calientes > Café
Bebidas > Bebidas Calientes > Té
Bebidas > Bebidas Frías > Bebidas Carbonatadas
Bebidas > Bebidas frías > Agua embotellada
Bebidas > Bebidas Frías > Jugos y Concentrados
Hay formas más sencillas de diseñar su Panel de tareas, pero...
Si está pensando "¿Existen formas más sencillas de diseñar mi enfoque para la configuración del Panel de tareas?" ... Entonces la respuesta es sí".
Task Pad está diseñado a propósito para ser flexible para su uso previsto.
Por ejemplo, podría simplemente crear un artículo de Cloud POS estándar llamado "Latte" (en lugar de un producto Matrix con "Tamaño" como los artículos del componente Matrix).
Luego, puede usar un modificador de precio para determinar el tamaño del café con leche que se compra y cuánto costará. Eso definitivamente funcionará y también llevará menos tiempo crear sus productos finales en Cloud POS .
Sin embargo, siempre se requiere compromiso al decidir cómo estructurar sus datos.
Con el método de configuración simplificado descrito anteriormente, es probable que la cantidad de opciones de modificación que se ofrecen en el punto de venta genere una experiencia menos amigable para el usuario final.
Mi recomendación es que considere quién usará el Panel de tareas para vender sus productos finales y su experiencia general del cliente.
Es fundamental que lo que diseñe sea fácil de usar para su equipo (después de todo, lo usarán todos los días) y no generará una mala experiencia para el cliente. Con ese fin, diría que cuanto más esfuerzo se haga por adelantado, se obtendrá un mejor resultado general.
Comience poco a poco: primero pruebe solo algunas categorías, modificadores y productos finales y luego, si está satisfecho con la dirección en la que se dirige... continúe con confianza.
Bien... esa es la teoría.
El resto de este artículo CÓMO lo ayudará a poner esto en práctica y crear su Panel de tareas de Cloud POS
Configuración de las categorías de su panel de tareas
Ubicar la pantalla de configuración del panel de tareas en la oficina Cloud POS
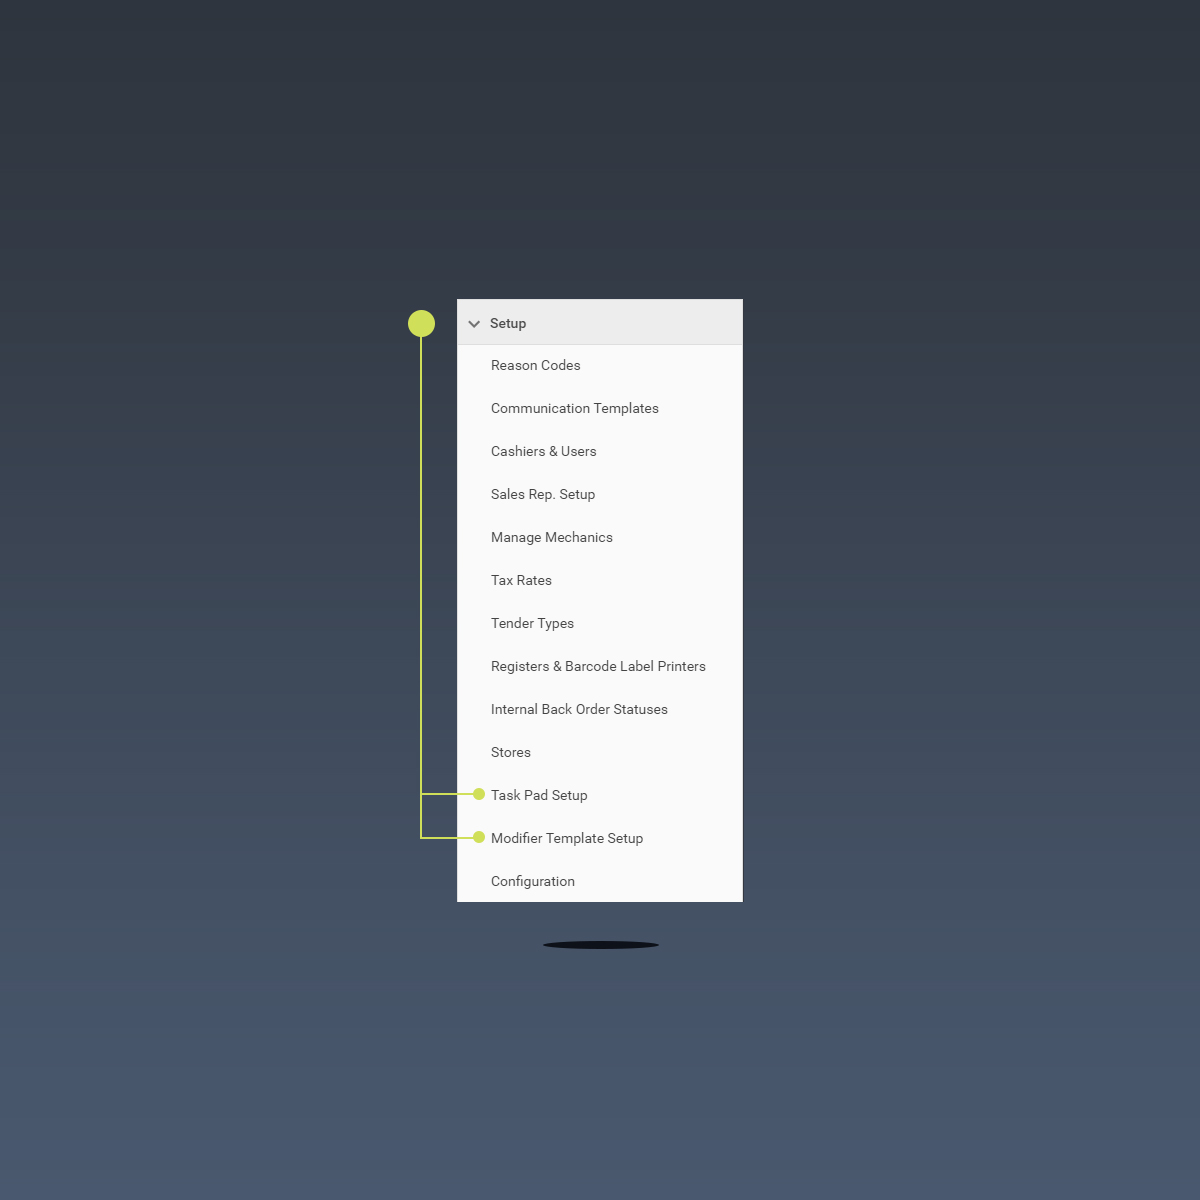
Desde la Oficina Cloud POS , localice la sección Configuración dentro de la navegación principal (deberá hacer clic en el encabezado para ver las opciones de Configuración).
Ubique la opción Configuración del Panel de tareas dentro de la sección Configuración y haga clic para acceder a las pantallas de Configuración del Panel de tareas.
Creación de una nueva categoría de panel de tareas
Las categorías del panel de tareas se crean dentro de una estructura jerárquica simple. Lo primero que debe hacer es crear una nueva categoría de nivel superior .
Pero, antes de eso, exploremos el diseño de la pantalla de configuración del panel de tareas:
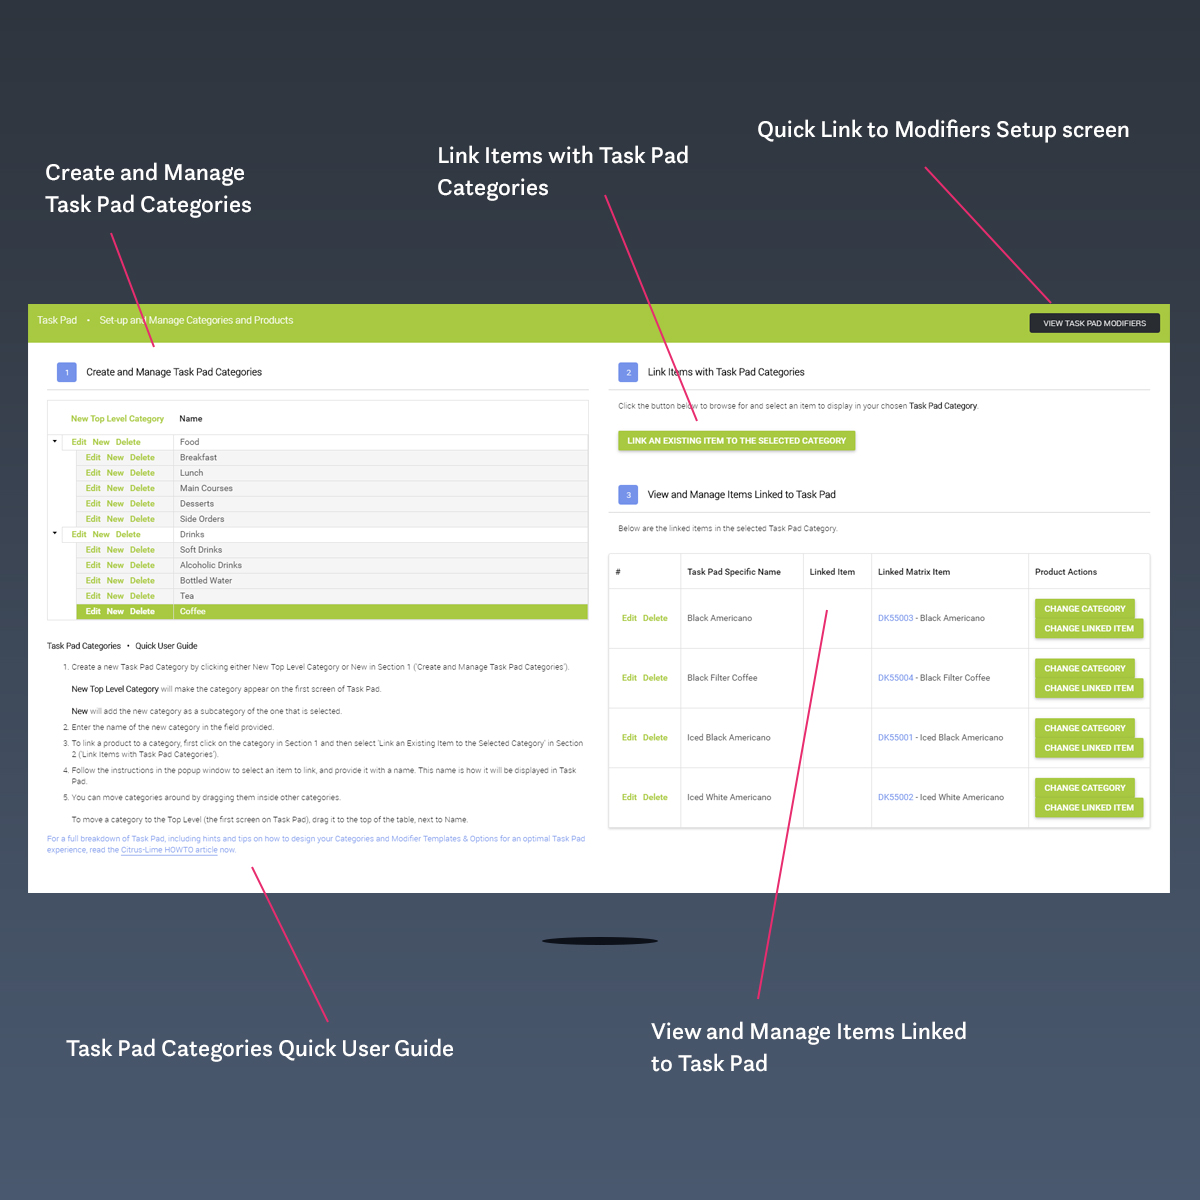
Sección #01: Crear y administrar categorías del panel de tareas
Desde aquí, puede crear y administrar la jerarquía de Categorías de su Panel de tareas:
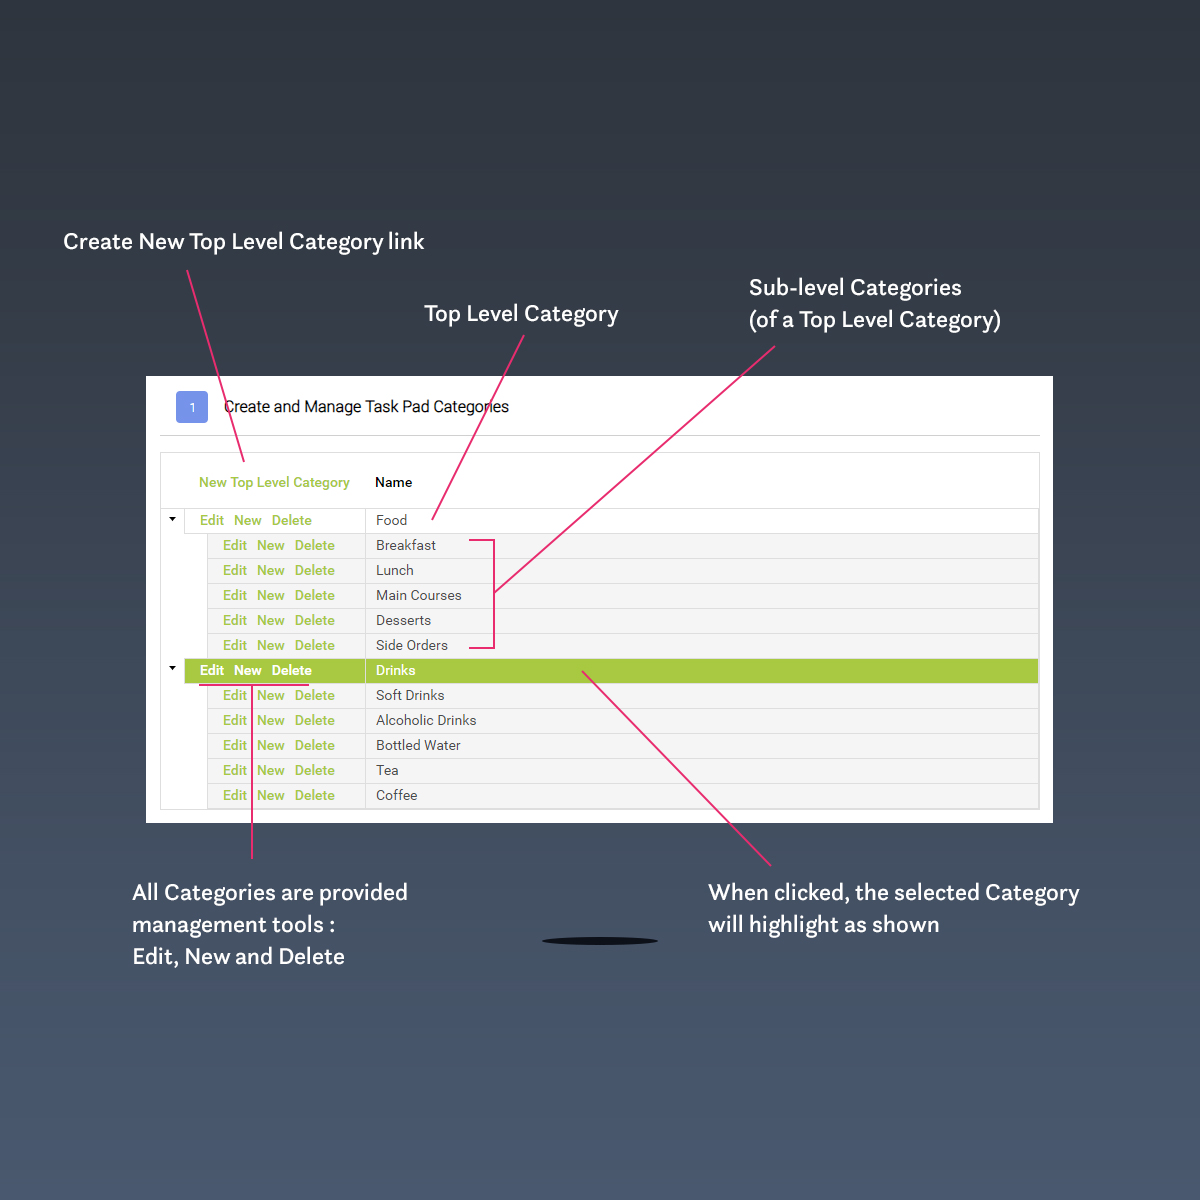
Para comenzar, haga clic en el enlace Nueva categoría de nivel superior. Se le presentará un cuadro de diálogo para que nombre su categoría. Ingrese el nombre en el campo proporcionado y luego haga clic en el botón Crear categoría de panel de tareas .
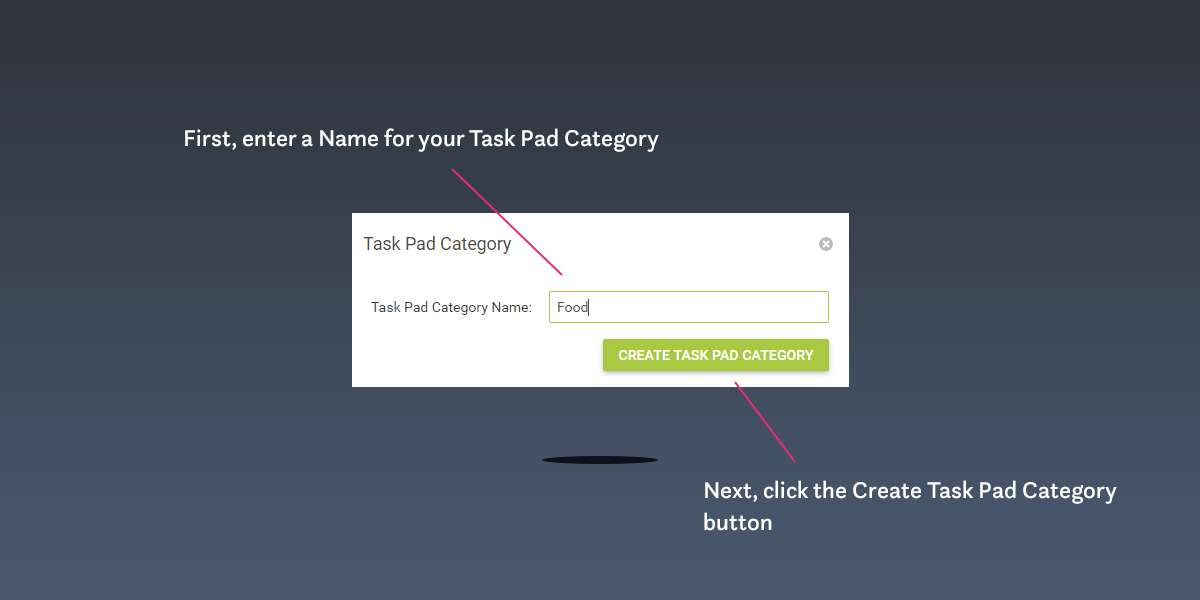
Su categoría de nivel superior recién creada se presentará en la pantalla de cuadrícula en la Sección 1 de la pantalla Configuración del panel de tareas.
Repita este proceso para crear cada una de sus categorías de nivel superior (hasta un máximo de 8 veces).
Una vez que haya creado todas sus categorías de nivel superior, puede comenzar el proceso de creación de categorías de subnivel.
Para crear una categoría de subnivel, seleccione la categoría de nivel superior en la que desea crear categorías de subnivel. La categoría de nivel superior se resaltará en verde. En la Categoría de nivel superior, busque la opción Nuevo y haga clic en ella.
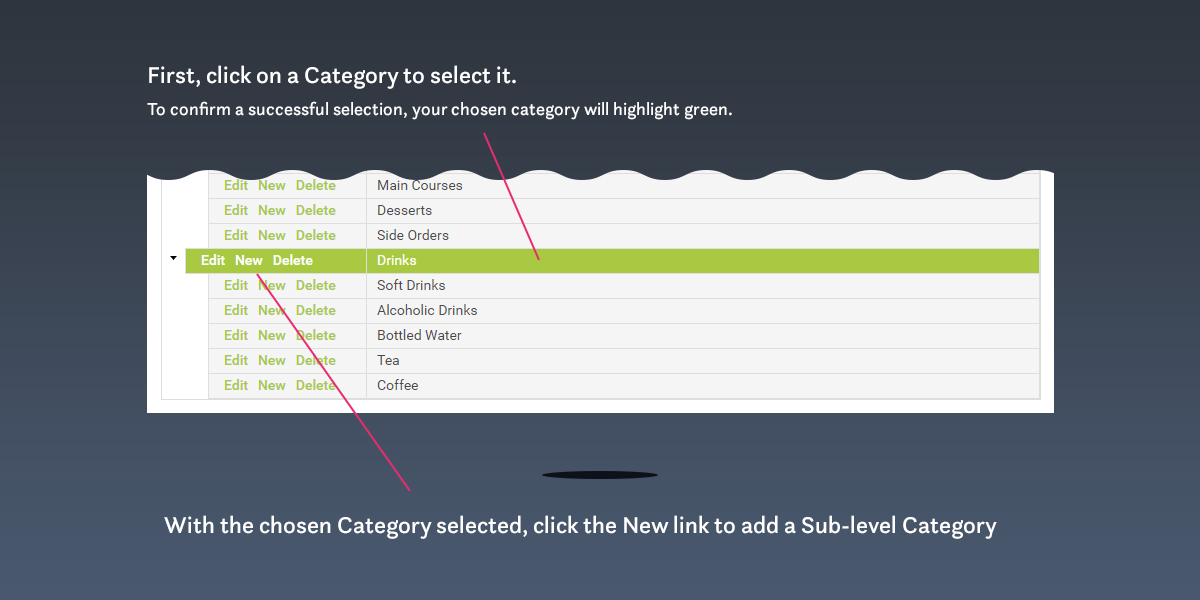
De manera similar al proceso de creación de Categoría de nivel superior, se presentará un cuadro de diálogo para que asigne un nombre a su Categoría de nivel secundario. Tenga en cuenta que, para las categorías de subnivel, el cuadro de diálogo se presenta directamente debajo de la categoría que ha seleccionado para agregar una categoría de subnivel.
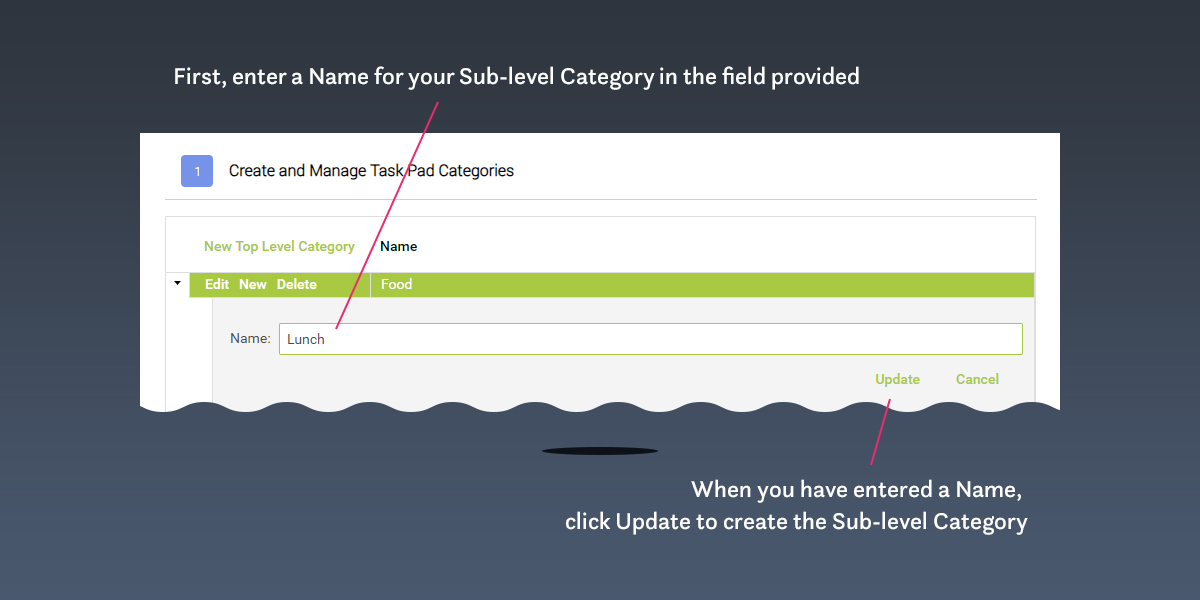
Una vez presentado, ingrese el nombre de su categoría de subnivel en el campo provisto y luego haga clic en el botón Actualizar.
Repita este proceso para crear todas sus categorías de subnivel (hasta un máximo de 8 veces).
Sección #02: Vincular productos finales con categorías de nivel final del panel de tareas
Las categorías de nivel final se pueden considerar como el "destino final" en su árbol de categorías.
Categoría de nivel superior > Categoría de subnivel > Categoría de nivel final
Un ejemplo del mundo real podría ser:
Bebidas > Bebidas Calientes > Cafés
Las Categorías de nivel final son donde debe vincular los Productos finales que desea que estén disponibles a través del Panel de tareas.
Antes de continuar con la vinculación de productos finales...Vincular un producto final con una categoría de nivel final es sencillo, pero le recomiendo que cree sus plantillas de modificador y opciones de modificador antes de vincular elementos con el panel de tareas.
También puede ser necesario (si aún no lo ha hecho y tiene la intención de crear nuevos elementos de Cloud POD como productos finales ) para crear los elementos de Cloud POS que necesita completar el Panel de tareas.
Saltar a la sección:
Configuración de las plantillas y opciones del modificador del panel de tareas
Saltar a la sección:
Creación de productos finales para usar con el panel de tareas
Para vincular un Producto final con el Panel de tareas, haga clic en el botón Vincular un elemento existente a la categoría seleccionada en la pantalla Configuración del Panel de tareas.
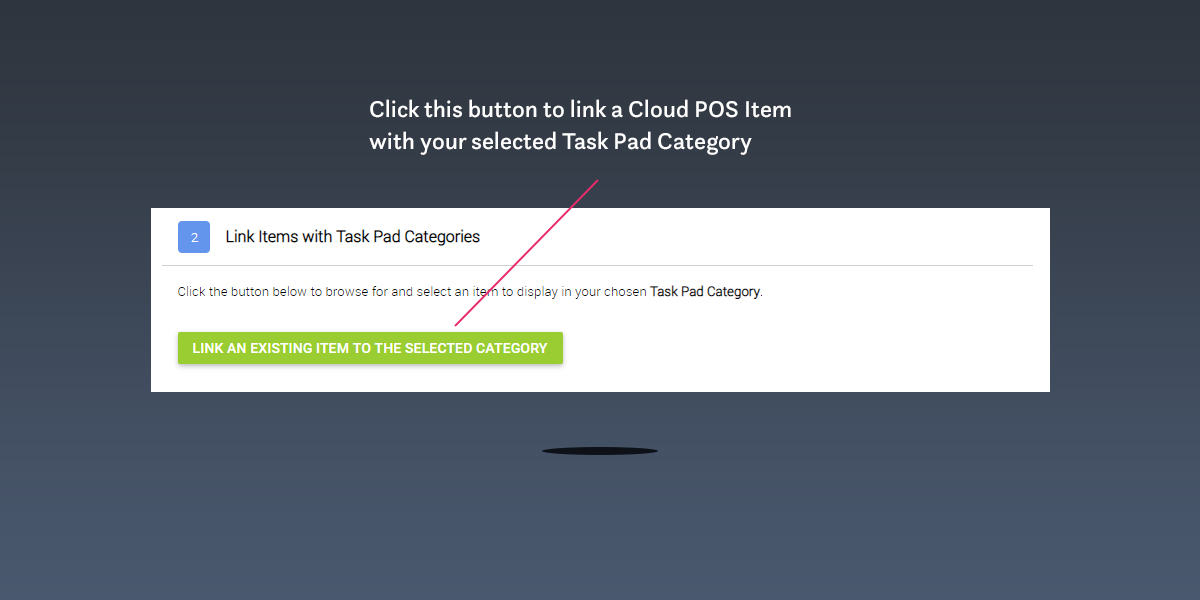
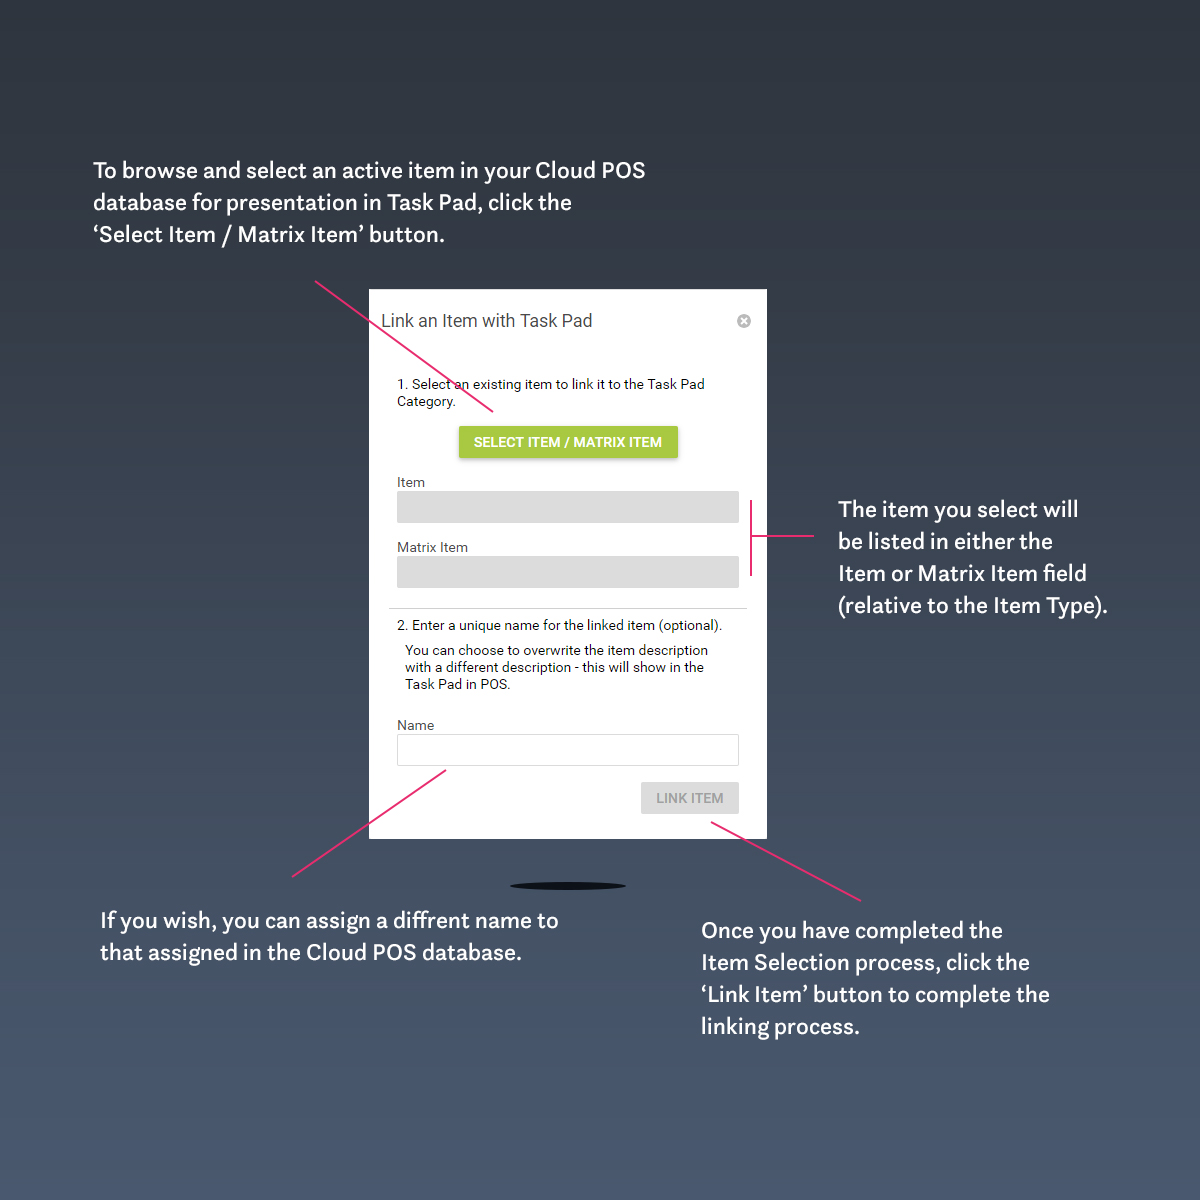
Se presentará un panel invitándolo a buscar elementos activos en la base de datos de productos de Cloud POS Para hacerlo, primero haga clic en el botón Seleccionar elemento/elemento de matriz .
Se mostrará un segundo panel (Panel de selección de elementos) que contiene sus elementos activos. Puede navegar a través de todos los elementos activos disponibles o refinar su búsqueda usando cualquier combinación de los filtros y campos de búsqueda presentados:
- Filtrar por tipo de artículo
- Busque en Código de búsqueda de artículos, Descripción, Marca, Departamento y Categoría.
Para ejecutar una búsqueda, presione la tecla Retorno en su teclado.
Cuando haya identificado el elemento que desea vincular con el Panel de tareas, haga clic para resaltar la fila (la fila seleccionada se resaltará en azul oscuro) y haga clic en el botón Seleccionar elemento al pie del panel.
El panel de selección de elementos se cerrará automáticamente y el panel Vincular un elemento con el panel de tareas estará disponible para que complete el proceso de vinculación.
Su elemento seleccionado aparecerá en el campo Elemento o Elemento de matriz (según el Tipo de elemento que haya elegido vincular con el Panel de tareas).
Si lo desea, puede asignar un nombre diferente al elemento para su presentación en el Panel de tareas.
Una vez que haya completado el proceso de selección de artículos, haga clic en el botón Vincular artículo (ahora se muestra como un botón activo) para completar el proceso de vinculación de artículos.
Repita los pasos para vincular elementos según sea necesario (recordando seleccionar las categorías relevantes a medida que avanza en los elementos que desea vincular con el Panel de tareas).
Sección #03: Ver y administrar elementos vinculados al panel de tareas
Todos los elementos vinculados con el Panel de tareas se pueden ver y administrar a través de la sección Ver y administrar elementos vinculados al Panel de tareas de la pantalla Configuración del Panel de tareas.
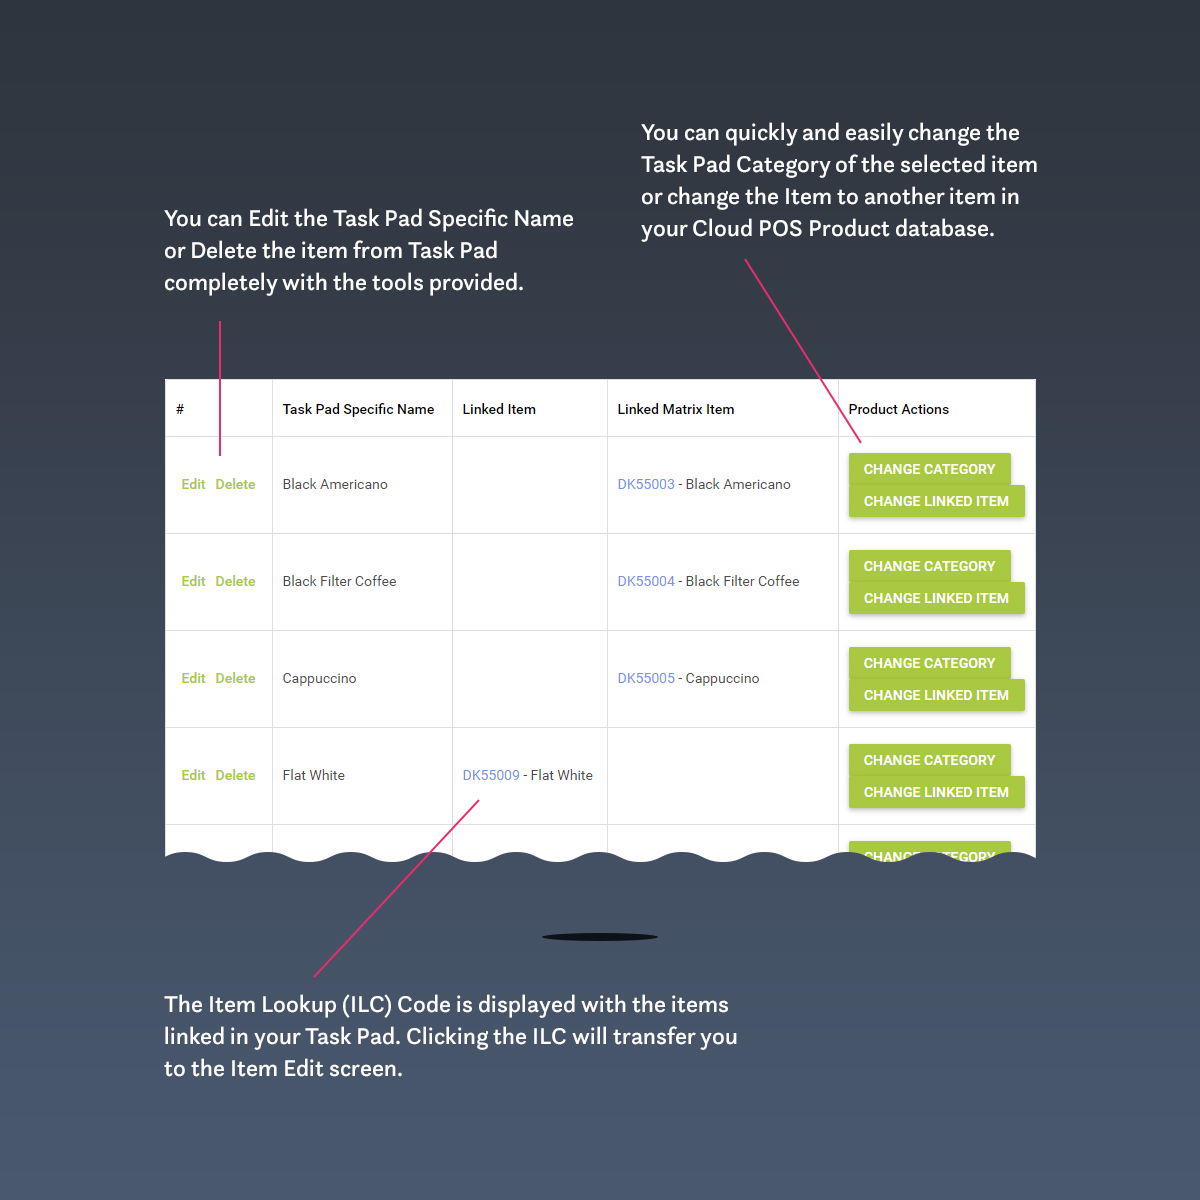
Para ver un elemento que se ha vinculado al Panel de tareas, primero debe seleccionar una categoría de la Sección n.° 01 ( Crear y administrar categorías del Panel de tareas ).
Desde la sección Ver y administrar elementos vinculados al panel de tareas , mediante los botones y vínculos proporcionados, puede:
- Edite el nombre del elemento como se muestra en el Panel de tareas;
- Elimine el elemento de la categoría seleccionada del Panel de tareas*;
- Ver el nombre específico del panel de tareas, el elemento vinculado (o el elemento de matriz) y el código de búsqueda de elementos asociado;
- Cambie la categoría del panel de tareas y para el elemento seleccionado;
- Cambie el artículo vinculado a otro artículo activo en su base de datos de productos de Cloud POS
- Transfiera directamente a la pantalla de edición de elementos de un elemento del panel de tareas seleccionado (haciendo clic en el ILC enumerado).
* Tenga en cuenta que, por diseño, eliminar un elemento de su Panel de tareas no eliminará el elemento de su Base de datos de productos de Cloud POS
Configuración de las plantillas y opciones del modificador del panel de tareas
Recordar ...
Las Opciones de modificador se pueden considerar como los medios con los que personalizar un producto (o servicio) para su cliente. Las opciones de modificador no Cloud POS seguimiento de inventario y vienen en dos formas... Notas y modificadores de precio .
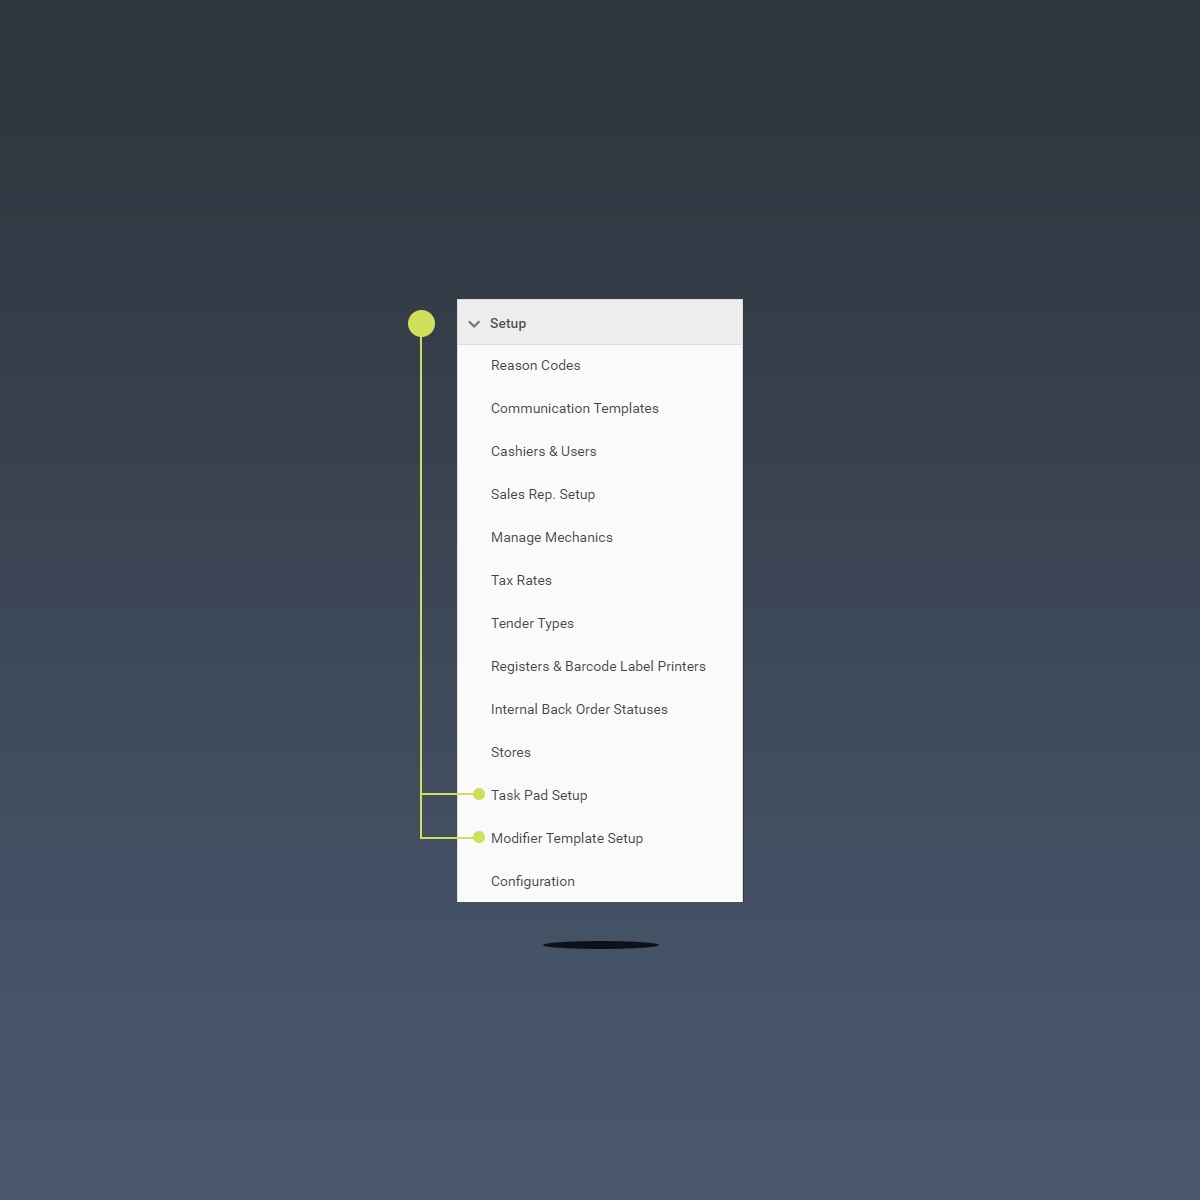
Para crear un modificador de panel de tareas, debe acceder a la pantalla Configuración de plantilla de modificador en la oficina Cloud POS
Para hacerlo, abra la navegación principal de Back Office y localice la opción Configuración de plantilla de modificador que se encuentra dentro de la sección Configuración.
Nota: Si ya se encuentra dentro de la pantalla Configuración del panel de tareas , se proporciona un botón en el área superior derecha de la pantalla para transferirlo rápidamente a la pantalla Configuración de plantilla de modificador.
Crear plantillas de modificadores y opciones de modificadores es simple pero, antes de continuar, familiaricémonos con las características de la pantalla de configuración de plantillas de modificadores:
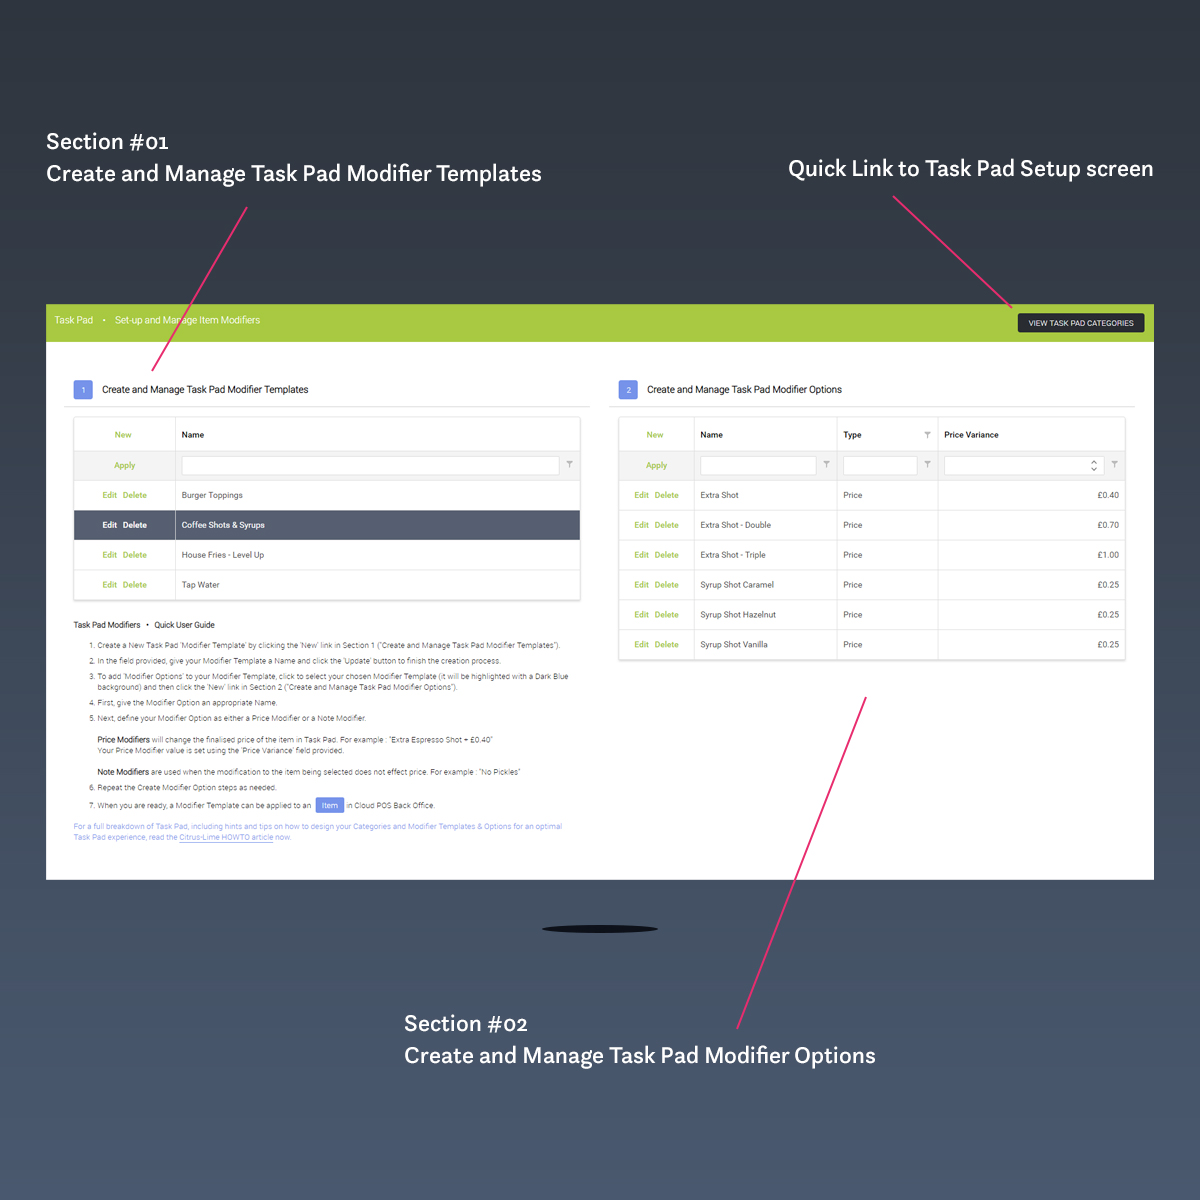
Sección n.º 01: Crear y administrar plantillas de modificadores del panel de tareas
Las plantillas de modificador del panel de tareas se crean para dar contexto a todas las opciones de modificador que vinculará dentro de él.
Por ejemplo, si planea ofrecer café y "Tragos de espresso extra" y "Sabores de jarabe" estarán disponibles como parte de su servicio de personalización de productos, entonces un nombre de plantilla de modificador lógico sería Tragos de café y jarabes .
Para crear una plantilla de modificador de panel de tareas, localice y haga clic en el enlace Nuevo dentro de la sección #01 de la pantalla Configuración de plantilla de modificador.
Una vez hecho clic, se mostrará un panel directamente debajo. Ingrese un nombre para su plantilla de modificador y haga clic en el enlace Actualizar para completar el proceso de creación. Si cambia de opinión, haga clic en el enlace Cancelar para cerrar el panel sin guardar.
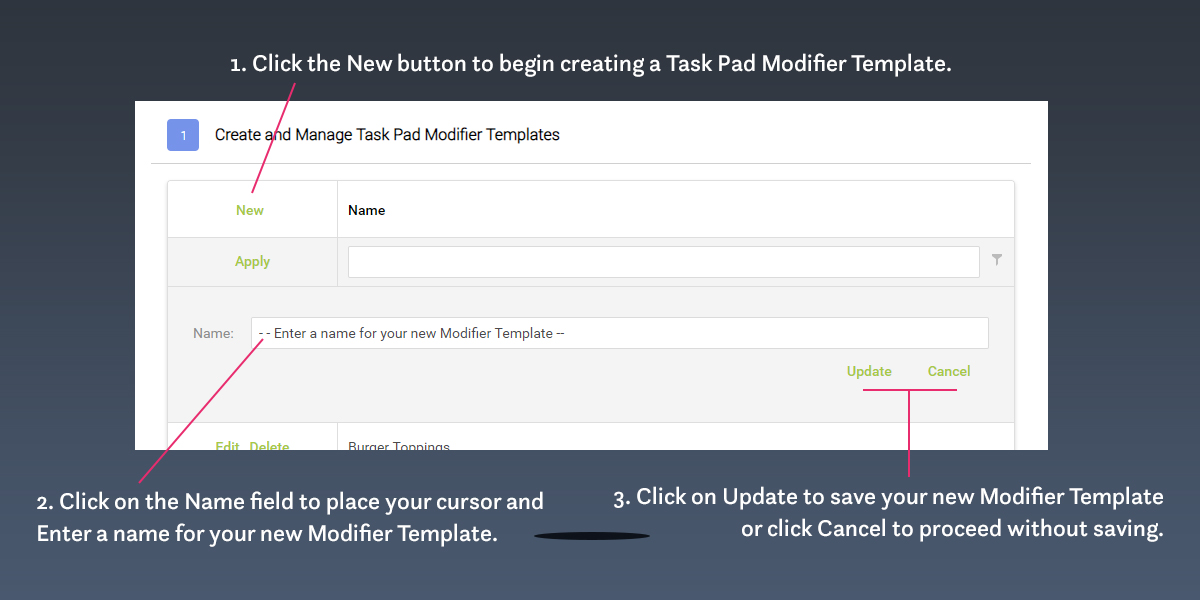
Repita los pasos de Crear nueva plantilla de modificador según sea necesario.
Si desea eliminar una Plantilla de modificador de su Panel de tareas, simplemente ubique la Plantilla de modificador correcta de la cuadrícula en la Sección #01 y haga clic en el enlace Eliminar proporcionado. Si ha creado una cantidad considerable de plantillas de modificadores, es posible que deba recorrer la cuadrícula o, alternativamente, utilizar las herramientas de búsqueda y filtro proporcionadas.
Para buscar una plantilla de modificador en su cuadrícula, haga clic en el campo de búsqueda proporcionado para colocar el cursor, escriba un término de búsqueda asociado con el nombre de la plantilla de modificador y presione Retorno en su teclado. La cuadrícula de plantillas de modificadores se actualizará para mostrar una selección refinada de plantillas de modificadores que contienen el término de búsqueda especificado.
Tenga en cuenta que al eliminar una plantilla de modificador también se eliminarán todas las opciones de modificador que se han vinculado con la plantilla de modificador que está eligiendo eliminar. El proceso de eliminación también eliminará la asociación con cualquier elemento de Cloud POS que haya establecido anteriormente.
Sección n.° 02: Crear y administrar las opciones del modificador del panel de tareas
Para crear Opciones de Modificador de Panel de Tareas dentro de una Plantilla de Modificador de Panel de Tareas específica, primero ubique su Plantilla de Modificador elegida dentro de la cuadrícula en la Sección #01 ( Crear y Administrar Plantillas de Modificador de Panel de Tareas ) y haga clic para seleccionarla (la fila de la cuadrícula se resaltará en Azul Oscuro ).
Una vez seleccionada, la cuadrícula en la Sección 02 (Crear y administrar opciones de modificador del panel de tareas) se actualizará para mostrar cualquier opción de modificador asociada anteriormente.
Nota: si la cuadrícula está en blanco después de la selección de una plantilla de modificador, esto indica que aún no hay opciones de modificador asociadas.
Antes de crear una nueva opción de modificador dentro de su plantilla de modificador seleccionada, familiaricémonos con las funciones de la cuadrícula de opciones de modificador que se muestra en la sección #02:
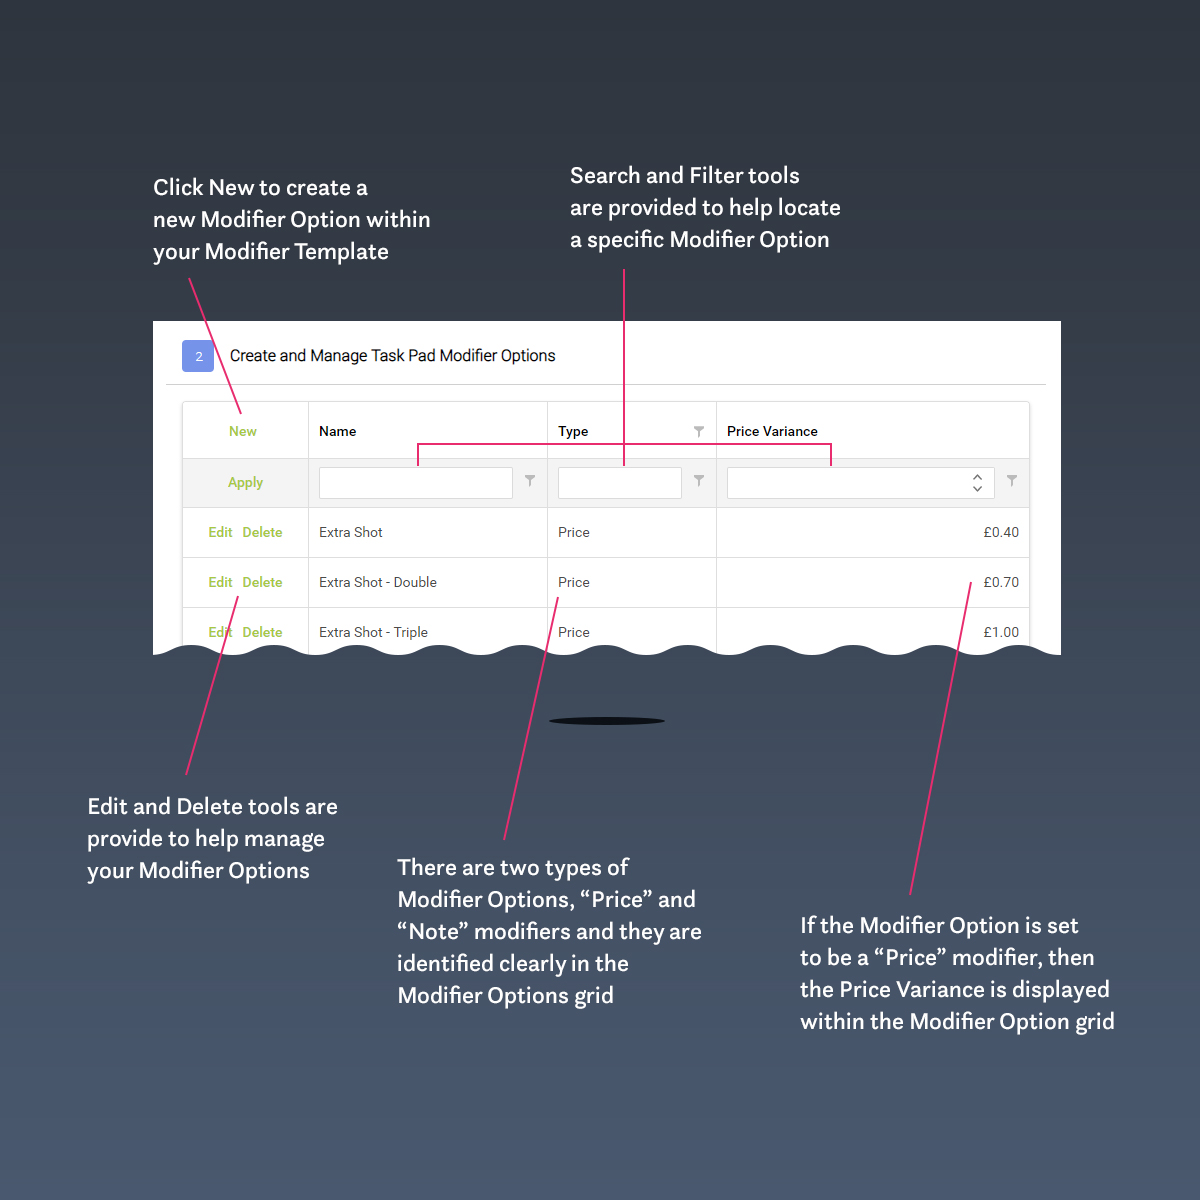
Para crear una nueva opción de modificador, ubique y haga clic en el enlace Nuevo dentro de la cuadrícula de opciones de modificador en la sección #02.
Una vez que haya hecho clic en el enlace Nuevo , se presentará un panel directamente debajo.
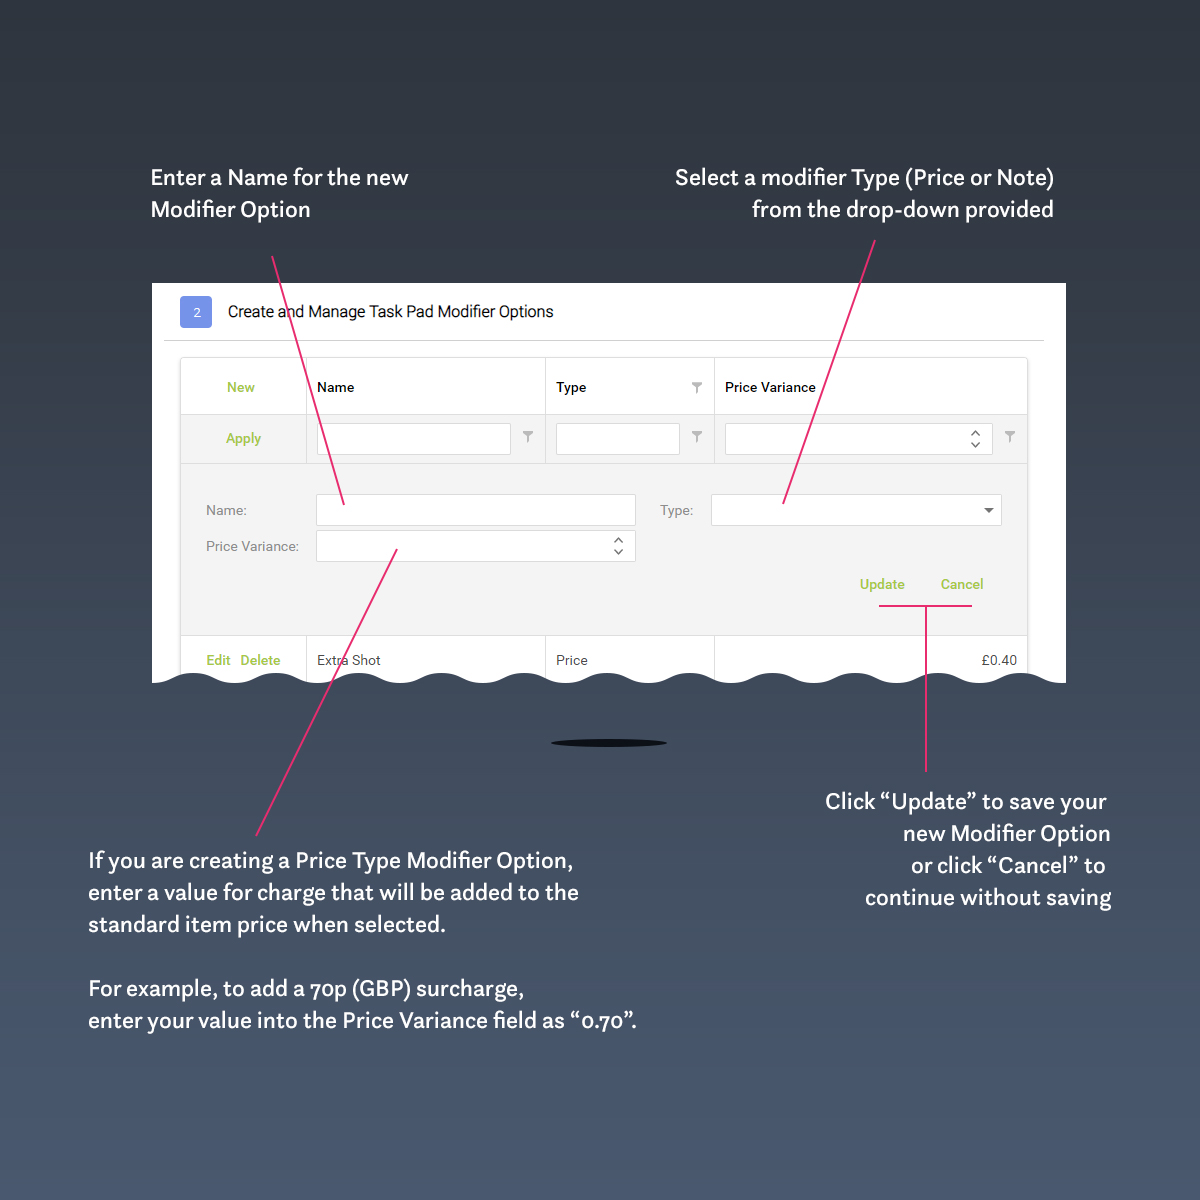
- Ingrese un nombre para su opción de modificador;
- Seleccione el tipo de opción de modificador que desea crear ( Precio o Nota ) de la lista desplegable provista;
- Si está creando un Modificador de precio, ingrese una Variación de precio en el campo proporcionado. Por ejemplo, si su Modificador de precio tiene un recargo de 70 peniques (GBP), ingrese su valor de Variación de precio como "0.70".
Una vez que haya establecido las propiedades deseadas de su opción de modificador, haga clic en el enlace Actualizar para guardar y continuar. Si desea continuar sin guardar, haga clic en el enlace Cancelar.
Repita los pasos de la Nueva opción de modificador según sea necesario.
Creación de productos finales para usar con el panel de tareas
¿Qué se entiende por "Productos Finales"?
Los productos finales son esencialmente Cloud POS creados para su uso en el panel de tareas.
Por ejemplo, consideremos un "Latte". Hay diferentes formas de abordar esto pero, en mi opinión, consideraría un "café con leche" como un tipo de producto , no como un producto final . En el lenguaje tradicional de Cloud POS , un Latte sería un Matrix Parent . Los componentes de la matriz de Latte serían relativos al tamaño .
¿Qué Cloud POS son mejores para el Panel de tareas?
En última instancia, puede optar por mostrar cualquier Cloud POS dentro del Panel de tareas. Task Pad es efectivamente una forma alternativa de organizar, buscar y seleccionar artículos para agregar a una transacción de Cloud POS
Sin embargo, dependiendo del uso previsto del Panel de tareas, ciertos tipos de elementos son más lógicos que otros.
En un ambiente de Café , normalmente habrá una mezcla de productos Hechos por Pedido y CPG * en el menú.
* CPG = Bienes de consumo envasados: un ejemplo de un artículo de CPG serían las bebidas enlatadas (es decir, Coca-Cola Light... ¡hay otras bebidas carbonatadas dietéticas disponibles!).
Por lo general, los artículos que se fabrican por encargo no se rastrean en el inventario de la misma manera que los artículos CPG.
Por lo tanto, es recomendable crear su artículo Cloud POS como Non-Inventary .
Si no hay aspectos de dimensión a considerar con su artículo de menú (como el tamaño ), entonces debe crear su Cloud POS como un artículo estándar, sin inventario .
Sin embargo, si (por ejemplo) el tamaño es una consideración del artículo del menú, podría considerar crear nuestro artículo de Cloud POS como un artículo de matriz y generar artículos de componentes a partir de la aplicación de una plantilla de matriz.
La alternativa es crear artículos estándar individuales que no sean de inventario para cada variante de tamaño del artículo del menú.
Cada enfoque tiene ventajas y compromisos en el proceso de configuración inicial, pero creo que, cuando las dimensiones como el tamaño son relevantes, un Elemento de matriz es el enfoque óptimo, ya que el proceso de selección dentro del Panel de tareas se simplifica para el usuario final (ya que no hay menos productos generales para seleccionar dentro de la interfaz de usuario, lo que acelera el tiempo de pedido y mejora la experiencia del cliente).
Sin embargo, en la actualidad, cuando se crean artículos de componentes de matriz en Cloud POS , no es posible generar los artículos de componentes automáticamente como artículos que no están en el inventario.
Después de generar los componentes, cada artículo resultante deberá abrirse y convertirse en un artículo que no sea de inventario. Este no es un proceso complicado, pero inicialmente le agregará una pequeña cantidad de tiempo. Sin embargo, es una tarea única que beneficiará al usuario final de manera significativa y aumentará su experiencia del cliente.
Recuerda que los Cloud POS pueden ser desactivados pero no eliminados. Con eso en mente, le recomendamos que planifique sus tipos de artículos antes de crearlos.
Aplicación de plantillas de modificador de panel de tareas a productos finales
El método para aplicar una plantilla de modificador de panel de tareas a un producto final es siempre el mismo; sin embargo, dependiendo del tipo de Cloud POS que elija para aplicar una plantilla de modificador, la ubicación de la función en la tarjeta de artículo puede variar.
En todos los casos, primero debe ubicar el Artículo dentro de la Oficina Virtual.
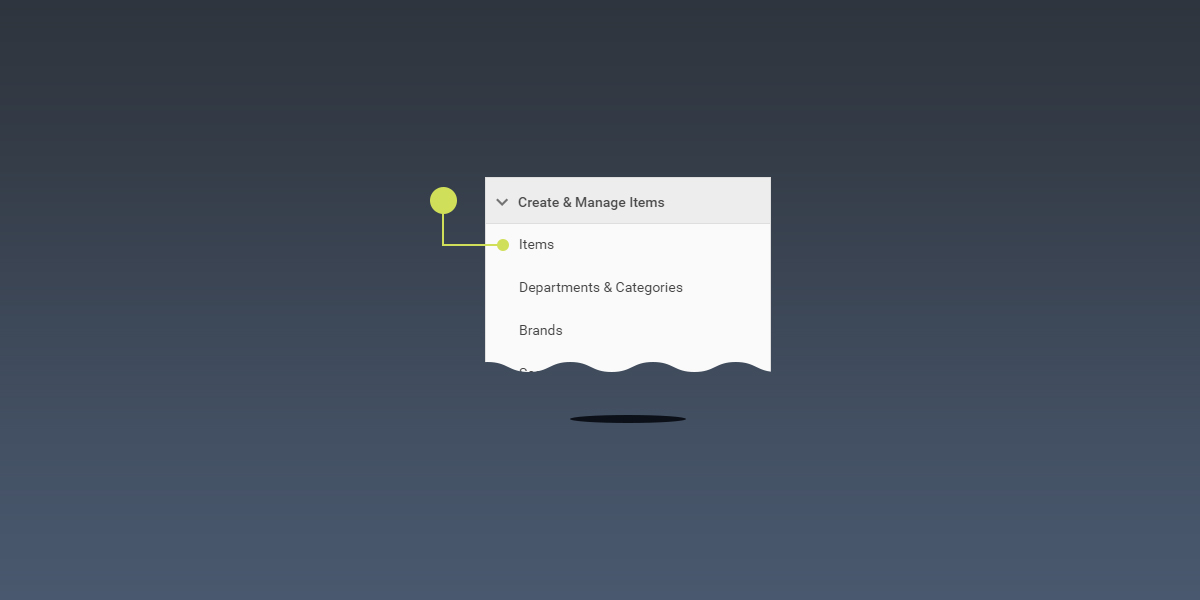
Expandiendo la navegación principal en Back Office, ubique la opción Elementos dentro de la sección Crear y administrar elementos y haga clic para acceder a la pantalla Examinar elementos.
Con las herramientas provistas en la pantalla Examinar elementos , ubique el Cloud POS la nube al que desea aplicar una plantilla de modificador de panel de tareas y haga clic para abrir la pantalla Editar elemento.
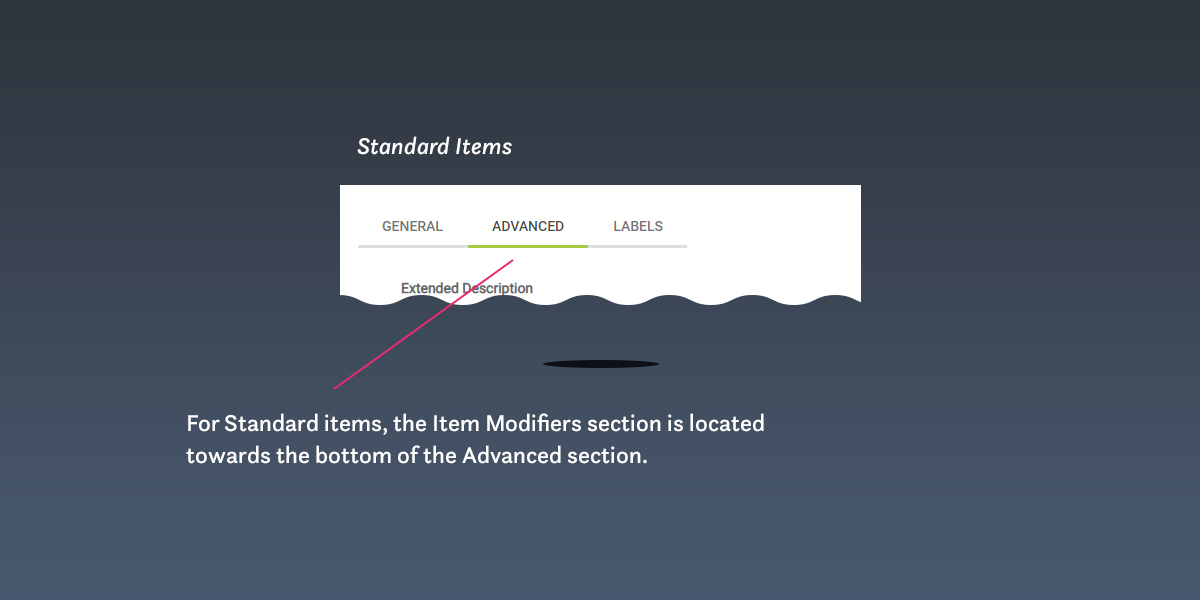
Artículos estándar: ubicación de la sección Modificadores de artículos en la pantalla Editar artículo
Haga clic en la pestaña Avanzado en la pantalla Editar elemento y, una vez cargado, desplácese hacia la parte inferior de la pantalla para ubicar la sección Modificadores de elementos y seleccione una plantilla de modificador para aplicar.
Elementos principales de la matriz: Ubicación de la sección Modificadores de elementos de la pantalla Editar elemento
No hay secciones de pestañas dentro de la pantalla Editar elemento de un elemento principal de matriz. Para ubicar la sección Modificadores de elementos , simplemente desplácese hacia la parte inferior de la pantalla.
Aplicación de plantillas de modificador a un artículo de Cloud POS
Una vez que haya localizado la sección Modificadores de elementos de la pantalla Editar elemento, aplicar una plantilla de modificador es rápido y fácil.
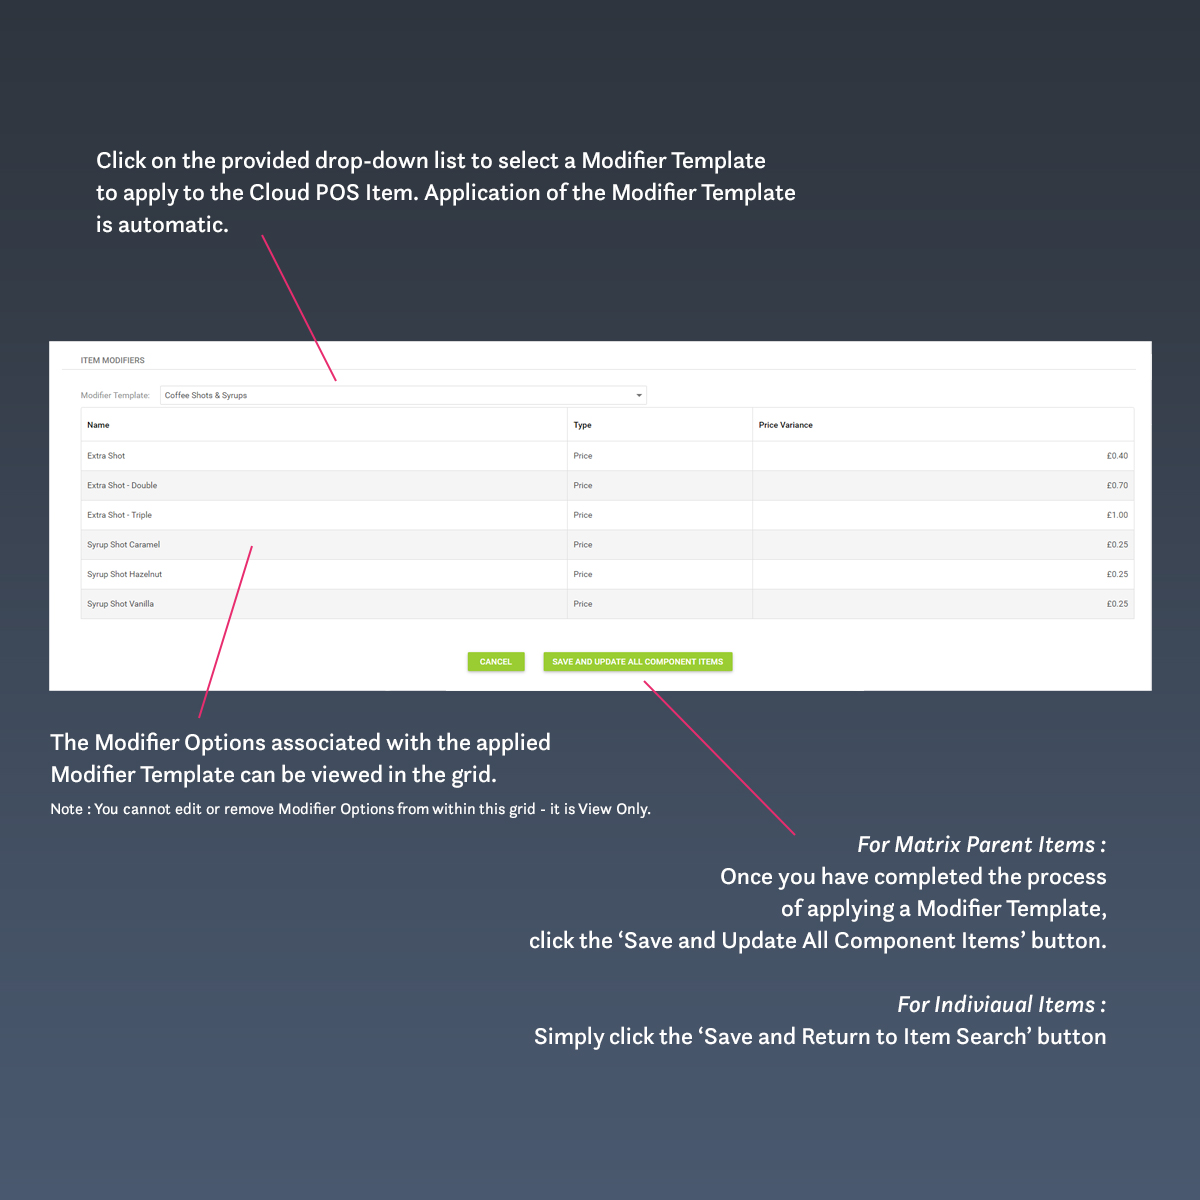
Simplemente seleccione la plantilla de modificador requerida de la lista desplegable provista y la plantilla de modificador se aplicará automáticamente. Las Opciones de modificador asociadas con la Plantilla de modificador aplicada se presentarán en una cuadrícula (debajo del menú desplegable Plantilla de modificador).
Tenga en cuenta que no puede editar ni eliminar las opciones de modificación de esta cuadrícula; es de solo lectura .
Reemplazo de una plantilla de modificador aplicada de un artículo de Cloud POS
Para reemplazar una plantilla de modificador aplicada de un Cloud POS , simplemente haga otra selección en el menú desplegable Plantilla de modificador en la pantalla Editar artículo.
Eliminación de una plantilla de modificador aplicada de un artículo de Cloud POS
Para eliminar una plantilla de modificador aplicada de un Cloud POS , simplemente seleccione la opción Ninguno de la plantilla de modificador en la pantalla Editar artículo.
Para las plantillas de modificador aplicadas a los elementos principales de Matrix, los pasos de Reemplazar o Eliminar se aplicarán automáticamente a todos los elementos de componentes de Matrix.
Configuración del panel de tareas: sugerencias y consejos
¿No puede ver los cambios que ha realizado en el Panel de tareas?
El panel de tareas se carga cuando se carga Cloud POS Till y no se actualiza hasta que Cloud POS se vuelve a cargar. Para ver cualquier cambio que realice en el Panel de tareas, incluidas las Nuevas categorías del Panel de tareas o los Elementos vinculados, debe reiniciar la sesión del navegador de Cloud POS
¿No puede ver algunos elementos en el Panel de tareas (aunque haya reiniciado su sesión de Cloud POS
Al configurar o modificar el Panel de tareas en Back Office, es posible que haya olvidado vincular sus elementos con una categoría del Panel de tareas. Es fácil de hacer. Seleccione una Categoría del Panel de tareas en la Sección n.° 01 de la pantalla Configuración del Panel de tareas en la Oficina virtual y verifique la cuadrícula en la Sección n.° 02 para asegurarse de que se hayan vinculado todos los elementos esperados. Si necesita vincular artículos, recuerde reiniciar la sesión del navegador de Cloud POS
¿Quiere configurar el Panel de tareas para que se cargue de forma predeterminada?
Dentro de Back Office, el Panel de tareas se puede configurar para que se cargue automáticamente como la pantalla de caja de Cloud POS Esto es perfecto si tiene Cloud POS dedicados a la configuración de su cafetería (u otro entorno de servicio rápido).
Para configurar Cloud POS de esta manera:
- En Back Office, busque la sección Configuración de la navegación principal y seleccione la opción Registros e impresoras de etiquetas de código de barras.
- Haga clic en la opción Editar en el Registro que desea configurar;
- Desde la pantalla Editar , busque la sección Configuración;
- Dentro de la sección Configuración , ubique Mostrar automáticamente el Panel de tareas después de cada transacción y marque la casilla de verificación Mostrar el Panel de tareas automáticamente ;
- Desplácese hasta la parte inferior de la pantalla Editar y haga clic en el botón Guardar.
Cuando reinicie la Cloud POS , el Panel de tareas se presentará automáticamente como la pantalla de Cloud POS
¿Quiere acceder rápidamente al Panel de tareas desde la pantalla de Cloud POS
Se puede acceder fácilmente al Panel de tareas desde el menú Acciones Cloud POS pero, si le gustan los atajos de teclado, puede acceder rápidamente al Panel de tareas presionando ALT+T en su teclado.
Si desea abandonar el Panel de tareas rápidamente y volver a la Cloud POS , puede hacerlo presionando la tecla ESC en su teclado.